
View/Create/Schedule/Delete incentives
Incentives are a crucial element of Zignyl's arsenal to power your success as a business user.
Incentives allow you to offer an hourly bonus to your team members when they hit specific sales targets. This increases team buy-in and aligns staff with the store's financial success.
Important Prerequisite: Because incentives are often based on beating sales targets, you must have an active Forecast published for the week before these will calculate correctly.
Here, in this article, you'll learn how to view incentives, create new incentives, and then schedule them.
Viewing Existing Incentives
There are two distinct entry points for viewing incentives: the Incentive Listing (which shows a list of rules and has a Refresh button) and the Calendar View (which shows the schedule and live-updates). You as the user can choose the one that fits your goal (auditing rules vs. checking the schedule).
Viewing Existing Incentives
There are two ways to view your incentives, depending on what you need to see.
Method 1: Calendar View (To Check the Schedule) Use this view to see when incentives are active on the calendar.
-
Navigate to Incentives > Calendar View.
-
Click the Location dropdown in the top left corner.
-
Select your store. The calendar will automatically update to show that location's active schedule.

Method 2: Incentive Listing (To Audit Rules) Use this view to see a list of all incentive "Blueprints" created for your stores.
-
Navigate to Incentives > Incentive Listing (or click Manage Listings from the main index).
-
Select the Location(s) from the filter menu.
-
Click the blue Refresh button to load the list.
-
From here, you can see the Status (e.g., Scheduled) or click the Pencil Icon to edit a rule.

Creating Incentives
First, you must build the "Blueprint" for the incentive. This defines the rules but does not automatically activate it.
-
Navigate to Incentives in the main menu.
-
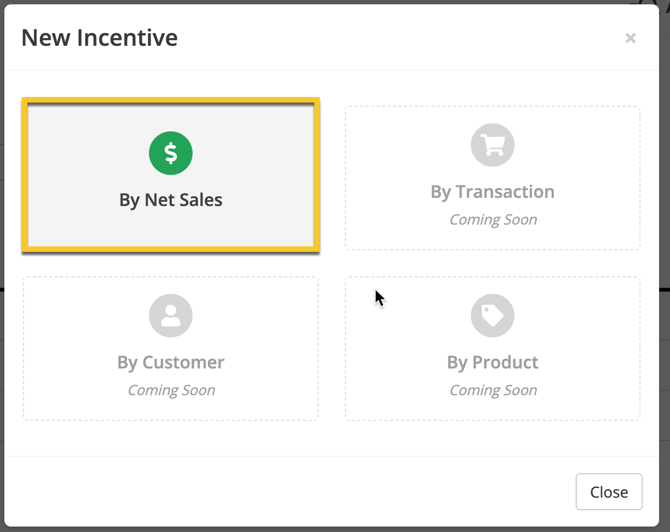
Click New Incentive. Currently, you can only set incentives by net sales targets.
-
Basic Setup:
-
Name: Give it a clear title (e.g., "Weekend Rush Bonus").
-
Location: Select the store this applies to.
-
-
Define the Trigger:
-
Select the starting point/goal (e.g., 10% above Forecast). This means the bonus kicks in only after the store exceeds its sales goal by that percentage.

-
-
Set the Payout Tiers:
-
Enter the $ Amount (Hourly Bonus) for the first tier.
-
Optional: Click Add Higher Tier to create stepped bonuses (e.g., +$1.00/hr for beating forecast by 10%; +$2.00/hr for beating it by 20%).

-
-
Parameters: Select the days of the week and an optional end date for the validity of this rule.

-
Verify the info and click Submit.


After this, you'll be ready to schedule the incentive you've just created!
Scheduling Incentives
Once the rule is created, you must place it on the calendar to activate it. On the Incentives dropdown as shown in the picture below, select "Calendar View".

Select the location you'd like to add the incentive to and click "Schedule Incentive"

Pick your Start date and End date. Then, click "Save".

Please verify on your calendar that this incentive has been scheduled.
Managing & Deleting Incentives

If you notice you unintentionally scheduled 2 overlapping or you no longer want to offer a specific incentive, please follow the steps listed below:
-
Click on the specific incentive block on the calendar.
-
Select Delete from Calendar.
-
Series Choice: The system will ask if you want to delete:
-
Just this one: Removes the bonus for that single day.
-
All in the series: Removes the bonus for the entire recurring schedule.
-

