
Who is this article for? This section controls the configuration of your store. Access is determined by your role:
-
Managers: Have access to the General Settings tab. You can manage Store Hours, reset the Zignyl Clipboard password, and set In-Store Alerts.
-
Company Admins / Area Directors: Have full access to both the General Settings and the Admin Settings tab. This allows you to configure Payroll Rules, Forecast Generation, Sales Per Labor Hour (SPLH) targets, and POS Integration.
Note on Navigation: If you do not see the "Admin Settings" tab or the blue "Manage POS" button in the top right corner, your user account does not have Administrator privileges.
This section controls the "Physics" of your Zignyl universe - how overtime is calculated, when the work week begins, and the operational hours of your locations.
Part 1: Location Settings (The Store Profile)
Location Settings control the specific attributes of a single store. Navigate to: Side Menu > Location Settings.

General Settings & Clipboard Access: Upon clicking a location, you will see the General Settings tab.
-
Basic Information: Review the store's address and contact info.

-
Reset Clipboard Password: On the right side, you will see the Zignyl ID (Clipboard Login) and Current Password.
-
Critical Warning: Do NOT reset this password unless explicitly instructed by Zignyl Support or your Area Director. This password connects your physical iPad (Zignyl Clipboard) to the system. Changing it will immediately disconnect your store's Kiosk and stop data sync.
-


Work Week Settings (Store Hours): This controls when the system expects the store to be open for business.
-
Regular Schedule: Click the dropdowns for each day to set the standard Open and Close times.
-
Closed Days: If a day is unchecked, the system marks the store as "Closed" and will not generate labor forecasts for that day.

Click on the drop down and choose the time for opening/closing. If the day is not checked mark it will show as closed for that day.

Custom Weeks (Holidays & Exceptions): If you need to change hours for a specific week (e.g., extended holiday hours or a temporary closure) without messing up your "Regular Schedule":
-
Look at the This Week column (or click Add New Custom Week).
-
Check/Uncheck days and adjust hours for that specific period.
-
Result: The Zignyl Clipboard will use these temporary hours for that week only, then revert to the regular schedule.
-

In-Store Alerts: You can broadcast a message to the Zignyl Clipboard at the store level (e.g., "Health Inspection Tomorrow!").
-
Click the (+) Plus Sign under Dashboard Alerts.
-
Enter your message.
-
Click Save. To remove an alert, click the Trash Can icon.

Location Staff: Finally, scroll down to see a list of all active employees assigned to this store.
-
You can toggle "Show Inactive" to see terminated staff.
-
You'll see their First Name, Last Name, and Zignyl Permission Group (Employee, Shift Leader, Manager, Area Director, Company Admin).

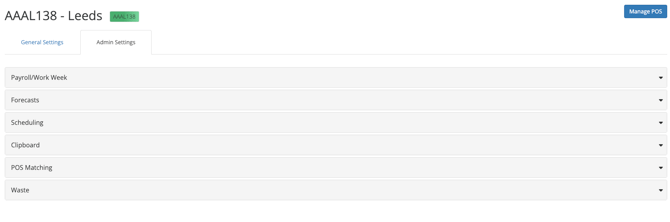
Part 2: Admin Settings
Area Directors and Company Administrators have access to the Admin Settings tab. This gives access to settings for Payroll/Work Week, Forecasts, Scheduling and POS Matching.
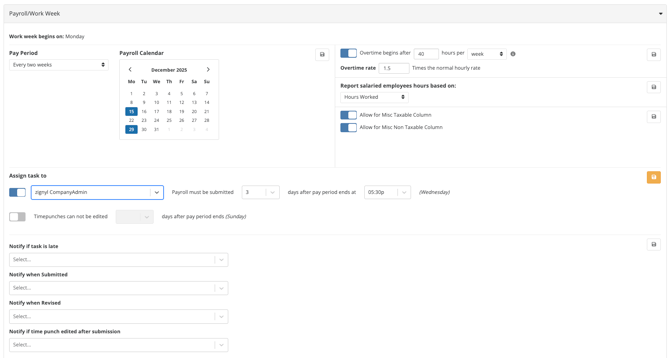
Payroll/Work Week Configuration: These settings are crucial in controlling how time and labor are calculated.
-
Pay Period: Select Weekly or Every two weeks.
-
Payroll Calendar: Use the date picker to visually confirm the start/end dates of the current cycle.
-
-
Overtime Rules:
-
Trigger: Set the threshold (e.g., Overtime begins after 40 hours per week).
-
Rate: Define the multiplier (e.g., 1.5 times the normal rate).
-
-
Salaried & Misc Settings:
-
Salaried Reporting: Choose how salaried hours appear (e.g., "Hours Worked" vs. "Flat").
-
Taxable Columns: Toggle "Allow for Misc Taxable/Non-Taxable Column" if you need to add bonuses or reimbursements in the payroll export.
-
-
Deadlines & Locks:
-
Submission Deadline: Set when payroll is due (e.g., 3 days after period ends at 5:30p).
-
Lock Timepunches: Toggle "Timepunches can not be edited" to lock the records X days after the period ends.
-
-
Notifications:
-
Select who receives alerts when Payroll is Late, Submitted, or Revised.
-
Audit Alert: You can specifically notify an admin if a time punch is edited after submission.
-
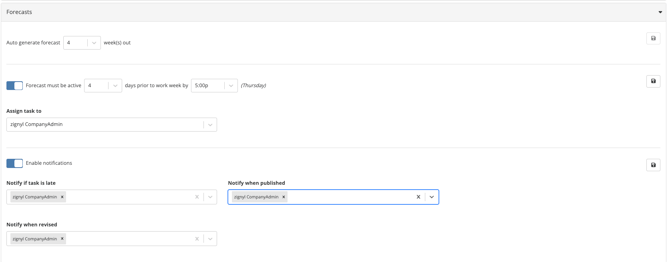
Forecasts Configuration: Automate how sales goals are generated and assigned.
-
Auto Generate: Set how many week(s) out the system should automatically create a baseline forecast (e.g., 4 weeks).
-
Deadline Rule: Toggle "Forecast must be active" to enforce a due date (e.g., 4 days prior to work week by 5:00p).
-
Why: The schedule cannot be built until the forecast is active.
-
-
Assignment: Use the Assign task to dropdown to make a specific manager responsible for this weekly task.
-
Notifications:
-
Late Alert: Select who is notified if the deadline is missed.
-
Status Alerts: Select who is notified when the forecast is Published or Revised.
-
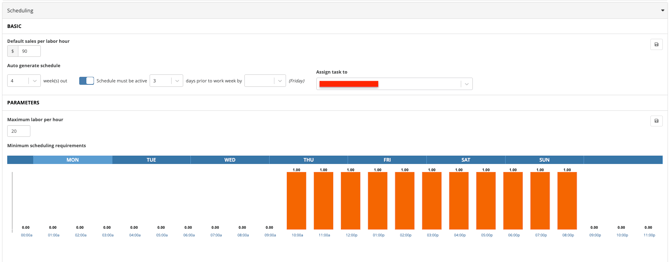
The Scheduling setting is where you set the following on the screenshots below:
-
Default Sales Per Labor Hour (SPLH): This number is the base logic for the scheduler.
-
How it works: The system takes your Forecasted Sales and divides it by this target to recommend labor.
-
Example: If set to $90, the system will recommend 1 labor hour for every $90 in projected sales.
-
Critical Dependency: If you do not have an active Forecast, this math equals zero, and the scheduler will recommend 0 staff.
-
-
Auto Generate: Set how far in advance the schedule creates a template (e.g., 4 weeks out) and set the submission deadline.
-
Assignment: Use the dropdown to designate the specific manager responsible for hitting this deadline.
-
-
Parameters (Labor Constraints):
-
Maximum Labor Per Hour: Set a hard cap on staffing levels (e.g., 20 people).
-
Note: The Lock Icon indicates this setting may be enforced by corporate policy.
-
-
Minimum Scheduling Requirements: The bar chart sets the minimum bodies required on the floor, regardless of low sales volume (e.g., "We always need 2 people to open").
-
How to Edit: Click on the bar for a specific hour. Use the (+) / (-) buttons or type a number.
-
Decimals Allowed: You can enter 0.5 to require a person for only 30 minutes of that hour.
-
-
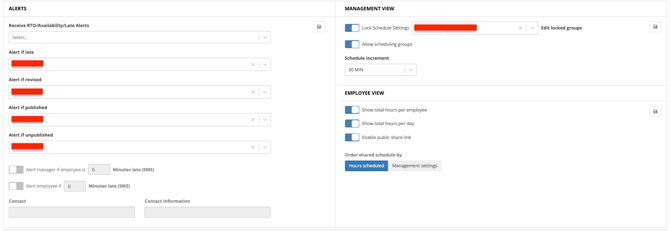
4. Management View Settings Control who can edit the schedule and how it is organized.
-
Lock Schedule Settings (Allow List):
-
If Toggled ON, scheduling settings are locked for everyone except the users listed in the box.
-
Use Case: Add "Derek King" and "Dustin King" here to ensure only they can change the configuration.
-
-
Allow Scheduling Groups:
-
Enables the creation of custom employee subsets (e.g., "Managers," "Kitchen," "Drive-Thru") for faster filtering and scheduling.
-
-
Schedule Increment: Define the granularity of shift blocks (e.g., 15 MIN vs 30 MIN).
5. Employee View Settings Control what crew members see on their app.
-
Visibility Toggles:
-
Show total hours per employee: (Often locked).
-
Show total hours per day: Allows staff to see the total daily labor volume.
-
-
Public Share Link: Enable a read-only URL for the schedule (useful for printing or emailing).
-
Order Shared Schedule By:
-
Hours Scheduled: Sorts employees by who has the most hours (highest to lowest).
-
Management Settings: Sorts employees based on your manually defined hierarchy (e.g., drag-and-drop to put Manager first, then Assistant Manager, then Crew).
-
The Alert settings are as follows:

-
Select the individual(s) who will receive alerts for Requests for Time Off (RTO), change in availability, and late alerts.
-
Select the individual(s) to alert if schedule is late, which manager when schedule is revised, published or if it is unpublished.
-
Slide On/Off bar for the amount of time allowed for late before alerted for manager and/or employee.
-
Contact information for manager that should receive late alerts
Under POS Matching, you can set the POS matching and who is responsible. That person would then be assigned to ensuring that each team member in the Zignyl system is correctly associated with your business' Point of Sale system ID, in order to track their per employee time punches, sales performance, and reporting information correctly across multiple platforms.

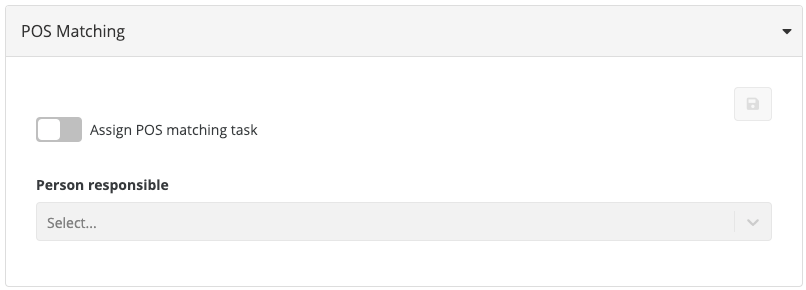
For more on POS matching, please see this link on Employee Management.
Waste:
Use the Waste settings in Admin Settings to control which products can be marked as waste on the Zignyl Clipboard.
As shown below, each product has a:
-
Product Name
-
Display Order
-
Active flag (On/Off)
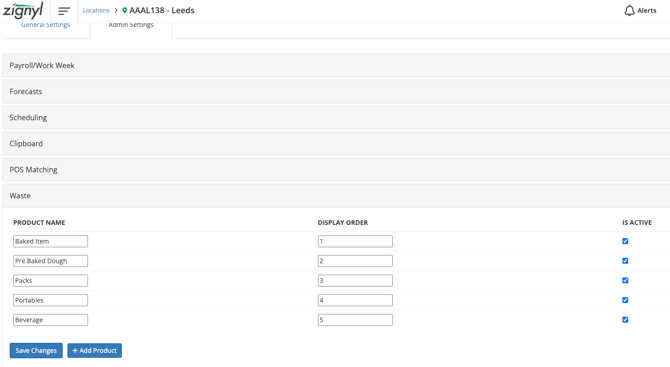
To add a waste item:
-
In Admin Settings, go to the Waste section.
-
2. Click + Add Product.
-
Type in the Product Name (for example, “Baked Item”).
-
Set the Display Order and Is Active flag.
-
Click Save Changes.
Result:
-
The product you add appears on the Zignyl Clipboard.
-
Store staff can select that product and mark it as waste when needed.
Part 3. Putting it Together for Opening Stores
Opening/Reopening Stores
How does this all tie together? In many cases, as a Manager, Area Director, or Company Admin, you'll have to either open or reopen stores in your Zignyl Management Portal. In some of these cases, you'll have to double check each of the configuration fields for both General and Admin Settings to ensure that the store gets off to a smooth start.
✅
3A. The Manager's Checklist (General Settings)
Verify these items to ensure the store profile is accurate and the Zignyl Clipboard is ready for staff.
-
✅ Basic Information: Verify the store address and phone number are correct (ensure no placeholder data like "1234 Anytown" remains).
-
✅ Zignyl Clipboard Login: Confirm you have the Zignyl ID and Password ready to log in the physical iPad at the store.
-
✅ Operating Hours: Go to Work Week Settings and confirm the "Open" and "Close" times are set for every active day. (Blank hours = Closed store).
-
✅ Custom Hours: If opening during a holiday week, ensure a Custom Week is added to override standard hours.
-
✅ In-Store Alerts: Set a banner text to display on the Clipboard for your team, eg. "Samples and Smiles!" or "No Phones in Front of Customers!"
3B. The Admin's Checklist (Admin Settings)
Strictly for Area Directors and Company Admins. These settings define the financial and operational rules.
-
✅ Payroll Logic:
-
Verify the Pay Period frequency (Weekly vs. Bi-Weekly).
-
Confirm the Work Week Start Day (e.g., Monday).
-
Set the Overtime Rule (e.g., >40 Hours) and Rate (e.g., 1.5x).
-
-
✅ Assignments:
-
Forecasting: Assign the specific manager responsible for submitting weekly sales projections.
-
Scheduling: Assign the manager responsible for building the labor schedule.
-
POS Matching: Assign the user responsible for mapping employee IDs to the POS system (Requires active POS connection).
-
-
✅ Clipboard Security:
-
IP Gating: (Optional) Configure IP restrictions if you only want the Clipboard to work on the store's specific Wi-Fi network.
-
-
✅ Waste Products:
-
Add relevant items (e.g., "Baked Item," "Raw Dough") to the Waste section so staff can log spoilage immediately.
-